Docker part 1 - Creating simple application with Docker Compose
Basics of Distributed Computing
Docker. How much do you know?
If you are software engineer with some experience, it’s very likely that you would already have some experience with Docker. Distributed systems and containers have taken over the world, and essentially every applications out there is containerized these days. Naturally, there are immense amount of contents associated with Docker beyond simple image build, pull, etc, and a lot of the sophisticated tools like Kubernetes, Terraform, Ansible, and etc operate on top of containers. I have used Docker here and there, and I thought it would be good to check how much I know about Docker and maybe fill up some gaps.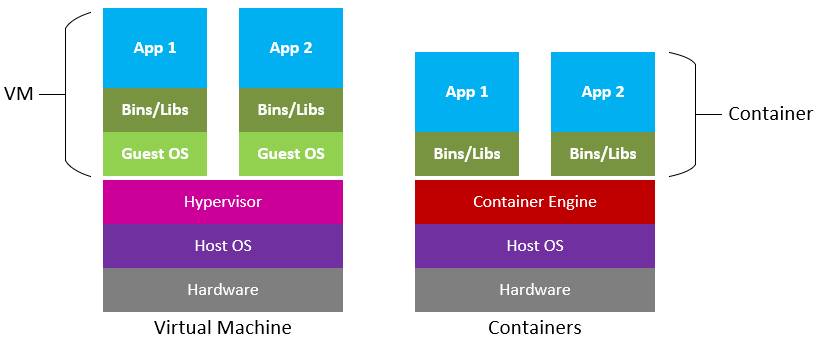
Docker is open source platform that offers container services. Containers are lightweight Virtual Machines (VM), and they leverage features of the host operating system to isolate processes and control the processes’ access to CPUs, memory and desk space. Unlike VMs that uses hypervisor that virtualizes physical hardware, containers virtualize the operating system (typically Linux or Windows) so each individual container contains only the application and its libraries and dependencies, allowing the applications to be ran on any operating system without conflicts.And typically applications would have more than one containers running. Application would consist multiple instances of containers (i.e Microservices) that are in charge of different aspects of the app, hosted in the virtual cloud like Elastic Container Registry (ECR), talking to each other over virtual network without being explosed to the internet.
Basics of Docker
Below is an example taken from the book Learn Docker in a Month of Lunches.
Okay now we reviewed what Docker is, and why we are using it. Let’s do the very basics according to the outline of the book. Assuming you have Docker installed in your environment already, let’s dive straight to it. I won’t even bother pulling pre-existing images and doing interactions with them, because I assume that we all already know how to do that.
#pull the docker images hosted on dockerhub already.
$ docker image pull diamol/ch03-web-ping

#run the ping application
$ docker container run -d --name web-ping diamol/ch03-web-ping

#check the logs collected by Docker
$ docker container logs web-ping

# tear down the container
$ docker rm -f web-ping

# run a version that pings to specific target, google in this case.
$ docker container run --env TARGET=google.com diamol/ch03-web-ping
Now, to write a Dockerfile that does above, we obviously need to write a Dockerfile. We can simply create one mirrowing the Image we have pulled from DockerHub. Refer to the Dockerfile.
FROM diamol/node
ENV TARGET="blog.sixeyed.com"
ENV METHOD="HEAD"
ENV INTERVAL="3000"
WORKDIR /web-ping
COPY app.js .
CMD ["node", "/web-ping/app.js"]
This copies the app.js file, and executes the code via CMD method. You can see that app.js file is looking for environment variables.
const options = {
  hostname: process.env.TARGET,
  method: process.env.METHOD
};
Build the code, and execute the same code:
$ docker image build --tag test .
$ docker container run --env TARGET=google.com test
Very easy. Next up, you have multi-stage Dockerfile that uses Java Application.
Working with multi-stage Dockerfile
Each stage starts with a FROM instruction, and you can optionally give stages a name with the AS parameter. In this example that uses JAVA, Maven is a build automation tool used primarily for Java projects. OpenJDK is a freely distributable Java runtime and developer kit. Maven uses an XML format to describe the build, and the Maven command line is called mvn. We can package everything together like this run make process, such as compiling and running applications in one go.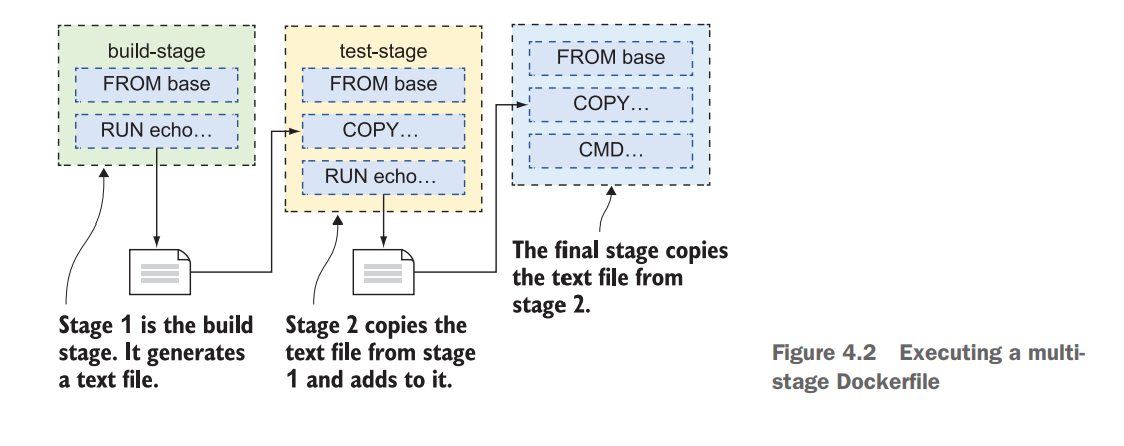
First pull the base images.
$ docker pull diamol/maven
$ docker pull diamol/openjdk
FROM diamol/maven AS builder
WORKDIR /usr/src/iotd
COPY pom.xml .
RUN mvn -B dependency:go-offline
COPY . .
RUN mvn package

# app
FROM diamol/openjdk
WORKDIR /app
COPY --from=builder /usr/src/iotd/target/iotd-service-0.1.0.jar .
EXPOSE 80
ENTRYPOINT ["java", "-jar", "/app/iotd-service-0.1.0.jar"]
- The builder stage starts by creating a working directory in the image and then copying in the pom.xml file, which is the Maven definition of the Java build.
- The first RUN statement executes a Maven command, fetching all the application dependencies. This is an expensive operation, so it has its own step to
- Make use of Docker layer caching. If there are new dependencies, the XML file will change and the step will run. If the dependencies haven’t changed, the layer cache is used.
- Next the rest of the source code is copied in—COPY . . means “copy all files and directories from the location where the Docker build is running, into the working directory in the image.”
- mvn package compiles and packages the application. This creates
Jarfile. - The app now copies compiled JAR file from the builder.
- App exposes port 80.
- ENTRYPOINT is alternative to CMD operation, executing compiled JAVA file.
Distributed Application: My Python Example - News Summarizer
Most applications don’t run in one single component. Even large old apps are typically built as frontend and backend components, which are separate logical layers running in physically distributed components. Docker is ideally suited to running distributed applications—from n-tier monoliths to modern microservices. Each component runs in its own lightweight container, and Docker plugs them together using standard network protocols. This involves defining Docker Compose.
One thing that I absolutely hate doing, is blindly following the textbook and running codes that someone else has written for you. This does not help learning in any ways, especially since these codes are not written in Python (Java, Javascript, etc). Best thing to do is defining your own examples. This is a very simple application, as it only has two parts to it, backend, and frontend. The codes can be found in this repository. Here is the general outline:
app/
├── config.env
├── docker-compose.yml
├── front/
│   ├── __init__.py
│   ├── Dockerfile
│   ├── main.py
│   └── requirements.txt
└── webscrapper/
    ├── __init__.py
    ├── Dockerfile
    ├── main.py
    ├── requirements.txt
    ├── scrape.py
    └── summarize.py
Backend (webscrapper)
The backend is written using FastAPI, as I have already gotten quite familar with it while reviewing RESTful Application structure There are two parts to the backend of our application:
- Webscrapper that randomly scraps news article and content from daily mail
- HuggingFace Machine learning model that summarizes news contents.
FrontEnd
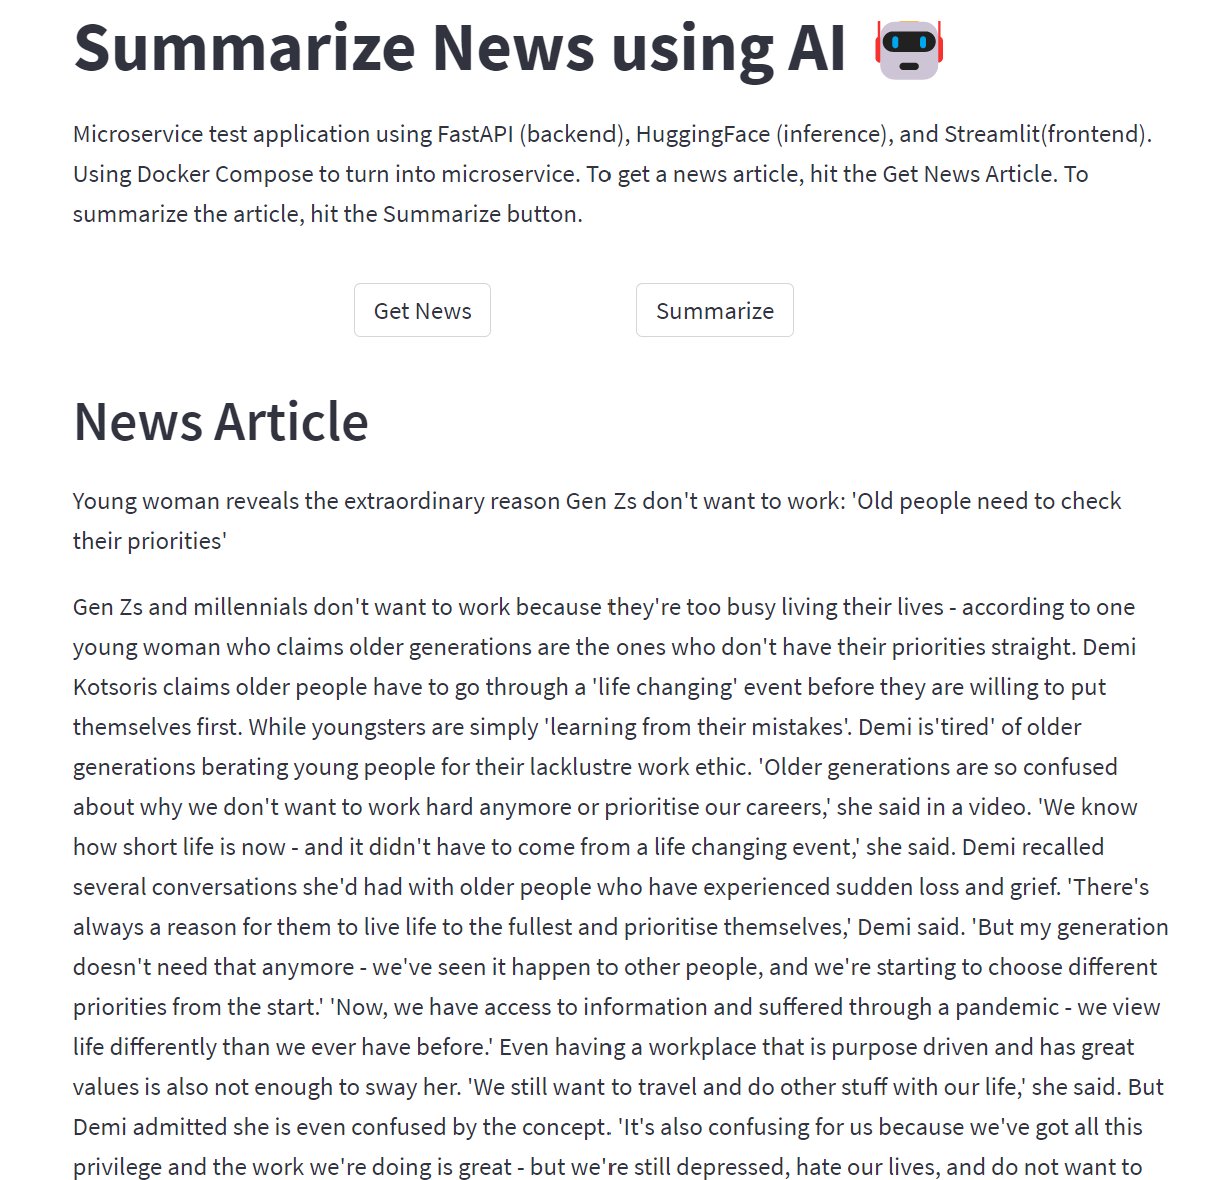
And finally a Lite-frontend module generated with Streamlit. Streamlit turns simple scripts into shareable web apps literally in minutes. Of course there are certain limitations so it cannot compete against full-stack frameworks like Django, or more conventional JS frameworks like Vue and React, but for fast application development to test ideas, Streamlit is a cleaner winner.
The overall idea is to have a very simple frontend page that loads and shows news article on button click (which calls webscrapper backend), and another button that turns loaded news article into an input for ML summarization model, loading the summary on the frontend when the inference finishes.
News Summarizer backend code
Let’s look into the details of the backend. The very first logic is loading the news article. Python has a html parsing library called BeautifulSoup, and all I am doing is reading dailymail news page, and randomly selecting one news article to generate an input.
import requests
from bs4 import BeautifulSoup
import numpy as np
import re
import random


def get_random_news():
    url = "https://www.dailymail.co.uk"
    r1 = requests.get(url)

    coverpage = r1.content
    soup1 = BeautifulSoup(coverpage, "html5lib")
    coverpage_news = soup1.find_all("h2", class_="linkro-darkred")

    list_links = []

    # choose a random number
    n = random.randint(0, len(coverpage_news))

    final_data = {}
    list_links = []

    # Getting the link of the article
    link = url + coverpage_news[n].find("a")["href"]
    list_links.append(link)

    # Getting the title
    title = coverpage_news[n].find("a").get_text()

    # Reading the content (it is divided in paragraphs)
    article = requests.get(link)
    article_content = article.content
    soup_article = BeautifulSoup(article_content, "html5lib")
    body = soup_article.find_all("p", class_="mol-para-with-font")

    # Unifying the paragraphs
    list_paragraphs = []
    for p in np.arange(0, len(body)):
        paragraph = body[p].get_text()
        list_paragraphs.append(paragraph)
        final_article = " ".join(list_paragraphs)

    # Removing special characters
    final_article = re.sub("\\xa0", "", final_article)

    final_data["title"] = title.strip()
    final_data["content"] = final_article

    return final_data
Now that the input is ready, I need a ML model that can run inference and generate summaries. The core ML model is just generic Summarization NLP model from Hugging Face. I did not bother retraining or optimizing the model, as the purpose of this example is to practice Docker, not to create state-of-the-art model. FastAPI uses Pydantic for data validation, so I created a very basic Data class here as well.
from transformers import pipeline
import warnings
from pydantic import BaseModel

warnings.filterwarnings("ignore")

class Data(BaseModel):
    """Data model for the summary. Keep it simple."""

    content: str


def summarize_random_news(content: Data) -> dict:
    """Summarizes a random news."""
    summarizer = pipeline("summarization", model="stevhliu/my_awesome_billsum_model")
    summarized_content = summarizer(content.content)
    actual_summary = summarized_content[0]["summary_text"]

    return {"summary": actual_summary}

if __name__ == "__main__":
    summary = summarize_random_news()
    print(summary)
It is possible to put these two functions into two different services, but to keep things simple, I have decided to group them together under single backend service. And of course I need the FastAPI main script to provide endpoint for above two functions. I do not have any DB setup at the moment, so there are no POST, DELETE or PUT. There are only simple GET function at the moment for each of the function. There are no parameters for get_news as it will just generate random news input. This input is passed to get_summary, and Pydantic will validate that it is proper string.
"""Simple scrapper that randomly scraps a website and gets sentences from it."""
from fastapi import FastAPI
from scrape import get_random_news
from summarize import summarize_random_news, Data

app = FastAPI()


@app.get("/api/v1/get/news", status_code=200)
async def get_news():
    """Simple get function that randomly fetches a news content."""
    return get_random_news()


@app.get("/api/v1/get/summary", status_code=200)
async def get_summary(data: Data):
    """Simple get function that randomly fetches a news content."""
    return summarize_random_news(data)
News Summarizer frontend code
Everything in the front is defined with Streamlit. Here, I need to manage the state of the news data and change them with the buttons.
import streamlit as st
import pandas as pd
import requests

import os

# init sessionv variables
if "news" not in st.session_state:
    st.session_state.news = "Click the button to get news"

if "summary" not in st.session_state:
    st.session_state.summary = "Click the button to get summary"
Then I need equivalent frontend functions to trigger the backend function. Here, hard coding the backend endpoint is a very bad practice. What if the URL changes? then you need to change every single one of them. So sensible way to do it is to declare them inside building Docker Compose, and use things like Enviornment variables.
def display_news():
    """Called upon onclick of get_news_button"""
    if "BACKEND_PORT" not in os.environ:
        backend_port = 5000
    else:
        backend_port = str(os.getenv("BACKEND_PORT"))

    # get the news from backend
    response = requests.get(f"http://backend:{backend_port}/api/v1/get/news")

    # response successful return the data
    if response.status_code == 200:
        content = response.json()
        text = content["content"]
        title = content["title"]
        return f"{title}\n\n{text}"

    else:
        return "Port set properly, but backend did not respond with 200"


def get_summary():
    """Called upon onclick of summarize_button"""

    if st.session_state.news == "Click the button to get news":
        return "Get news first, and then ask to summarize"

    if "BACKEND_PORT" not in os.environ:
        backend_port = 5000
    else:
        backend_port = str(os.getenv("BACKEND_PORT"))

    # get the news from backend using json obj (based on Pydantic definition).
    json_obj = {"content": st.session_state.news}
    response = requests.get(
        f"http://backend:{backend_port}/api/v1/get/summary", json=json_obj
    )

    if response.status_code == 200:
        content = response.json()
        summary = content["summary"]
        return summary
    else:
        return "Port set properly, but backend did not respond with 200"
Last part is the actual front-end portion of the page that can be literally defined in few lines. Creating buttons, lines, etc is very easy. The buttons will trigger state change, and the bottom text section will display whatever the current state of the session variable is set as.
st.title("Summarize News using AI 🤖")

st.markdown(
    "Microservice test application using FastAPI (backend), HuggingFace (inference), and Streamlit(frontend). Using Docker Compose to turn into microservice. To get a news article, hit the Get News Article. To summarize the article, hit the Summarize button.",
    unsafe_allow_html=False,
    help=None,
)

col1, col2, col3, col4, col5, col6, col7, col8 = st.columns(8)

col1, col2, col3, col4 = st.columns(4)


with col1:
    pass
with col2:
    get_news_button = st.button("Get News")
with col3:
    summarize_buttom = st.button("Summarize")
with col4:
    pass

if get_news_button:
    st.session_state.news = display_news()

if summarize_buttom:
    st.session_state.summary = get_summary()

st.header("News Article", help=None)
st.markdown(st.session_state.news)
st.divider()
st.subheader("Summary")
st.markdown(st.session_state.summary)
News Summarizer Dockerfiles
And of course there is the docker compose file and dockerfiles that glues everything together, and actually run things in harmony. First of all, Docker Compose file that wraps things together. Here, I am providing ENV file so that I do not have to hardcode the port number for FRONT and BACK. In terms of functionality, defining COMMAND in Docker Compose and defining it inside Dockerfile, shows no difference. So I am defining backend command to start a backend server in the Docker Compose. Health checks are implemented to periodically check the status of the containers, note, there is limitations in terms of self-healing mechanism, which will be addressed in the next post.
# docker-compose.yml
version: '3.8'
services:
  backend:
    env_file:
      - .env
    build: ./webscrapper
    ports:
      - ${BACKEND_PORT}
    volumes:
      - ./webscrapper:/app
    healthcheck:
      test: curl --fail http://localhost:${BACKEND_PORT} || exit 1
      interval: 1m30s
      timeout: 30s
      retries: 5
      start_period: 30s
    command: uvicorn main:app --reload --host 0.0.0.0 --port ${BACKEND_PORT}
    networks:
      default:
        aliases:
            - backend

  streamlit-app:
    env_file:
      - .env
    build: ./front
    container_name: streamlitapp
    depends_on:
      - backend
    ports:
      - ${FRONTEND_PORT}:${FRONTEND_PORT}
    working_dir: /usr/src/app
    healthcheck:
      test: curl --fail http://localhost:${BACKEND_PORT} || exit 1
      interval: 1m30s
      timeout: 30s
      retries: 5
      start_period: 30s
You can see from above that I am defining the backend network alias as backend, so that I do not have to hardcode any IP addresses for the frontend to receive the data from the backend. The frontend also depends on the backend. Use depends_on to express the startup and shutdown dependencies b/w services. Frontend will always depend on other services being ready. For scaling, you need to make sure that you are not binding yourself to a specific port. Otherwise you will get message saying your port has already been allocated when you try to scale your application like below:
docker compose up -d --scale backend=3
If your ports are set up properly, you can create multiple instances of the backend like below. Again, there are limitations regarding load-balancing regarding this approach, which will be addressed in the next post.
Front Dockerfile
And of course, you need the actual Docker files for frontend and backend. I am defining frontend start command inside the Dockerfile, but this could be defined inside Docker Compose file as well.
# reduced python as base image
FROM python:3.8-slim-buster

# set a directory for the app
WORKDIR /usr/src/app

# copy all the files to the container
COPY . .

# pip install dependencies
RUN pip install --no-cache-dir -r requirements.txt
# RUN apt-get -y update; apt-get -y install curl

# expose port in the environment.
EXPOSE ${FRONTEND_PORT}

ENTRYPOINT ["streamlit", "run", "main.py", "--server.port=8501", "--server.address=0.0.0.0"]
Backend Dockerfile
Backend is even more simple. All that is happening here is copying the files over to the container, downloading requirement files. The backend needs Pytorch, so you can technically use the Pytorch containers as well.
FROM python:3.9
# FROM nvcr.io/nvidia/pytorch:23.04-py3

WORKDIR /app

#copy to cache for faster run
COPY ./requirements.txt /code/requirements.txt

RUN pip install --no-cache-dir --upgrade -r /code/requirements.txt

# copy the everything over to container
COPY ./ /app/
Final Result
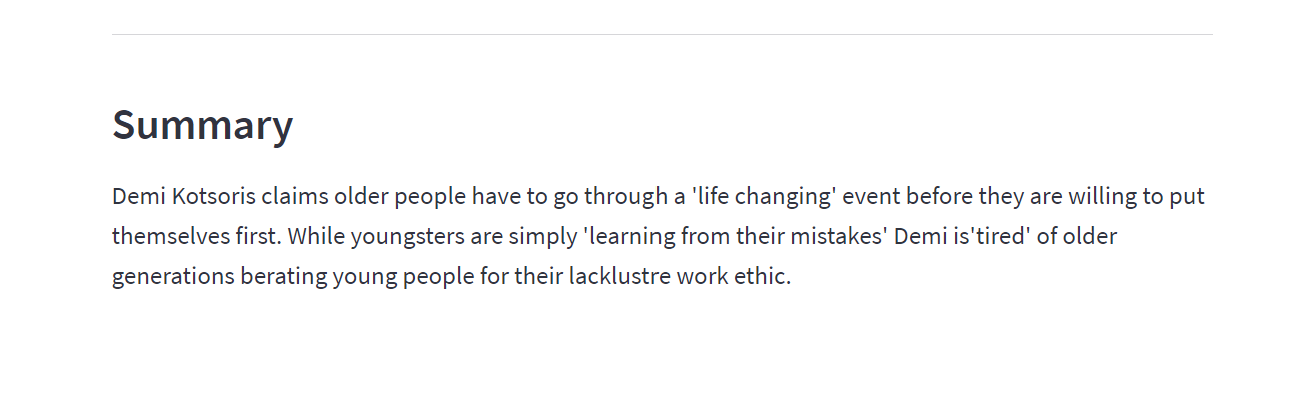
According to the front design, two buttons generate input and output. We can confirm that everything works as it should:
And the summary is generated perfectly as well.
Awesome, in the next post, I will try to improve this simple summary app.