SSH Part3 - Making SSH connections more secure using VPN
Expanding understanding of VPN and SSH.
This is the last post of the SSH series.
Dangers of Port Forwarding
In the previous post, I have successfully created a SSH connection to my home Linux Server using port-forwarding and openSSH. But all appproaches have some weaknesses, and there are some vulnerabilities to port-forwarding as well. Port forwarding inherently gives people outside of your network more access to your computer. Giving access or accessing unsafe ports can be risky, as threat actors and other people with malicious intents can then easily get full control of your device. Yes the chance that someone might really care to attack my PC in this fashion is very small, and we are already protecting our entrance using SSH keys, but we cannot deny the fact that there is a more secure way – VPN, which we have briefly discussed in the previous post.
VPN vs SSH
First of all, what is VPN (Virtual Private Network) exactly, and how is it different from SSH (Secure Shell)? You need to understand that one does not replace the other, as they have different used cases.
VPNs and SSH systems both create secure “tunnels” for your data to travel through. These tunnels ensure that nobody other than the intended recipient can view or alter your data.
SSH (Secure shell) protocol allows client to securely communicate/control the remote server from anywhere, by setting up direct client to server tunnel through the routers, which encrpyts signals passing through the channel. This is securely done by only allowing those who have authenticated to create SSH tunnels to the server. Unlike Windows Remote Desktop Protocol (RDP), there is no graphical user interface (GUI), but for coding purposes, you do not need anything more than the terminal.
VPN (Virtual Private Network) on the other hand, allows you to safely connect to the internet, by creating a tunnel within a network level that makes alterations to every data packets which are being sent by encrypting them and encapsulating them into a new network protocol. This is especially useful when you are connected to unsecured public network, which is usually the case when I am studying at a public library or a cafe. It would allow you to disguise your whereabouts, access certain regional content (location spoofing), and also allow access to certain protected contents that can only be approached within a specified network.
Obviously VPN alone won’t give you remote control over a network, but SSH and VPN in comination assures a deeper level of security. Meaning, even if the VPN is compromised, then an attacker/prober would still need to penetrate the SSH connection to get anything of value.
2.0 - Raspberry Pi as VPN server
I intend to set up VPN server so that:
- Make sure I am safe under network eavesdropping when using unsecured public wifi (important even if I am not using SSH features)
- Allow SSH access to my Home Linux Machine directly via private IpV4 connection instead of Public IPv4 + Port Forwarding. Stop exposing myself to the internet. (This will require setting static IP though, so my ISP does not keep on changing IP address assigned to my Linux Machine)
- Secure the SSH connections by configuring SSH rules to only open up connections to home ip address. No one would be able to SSH into my PC without first being able to connect to my VPN sever. Makes everything extra secure.
Okay, so the intention here is to create a self-hosted VPN server that runs 24/7, which would disguise all my traffic to internet as my home network. I can’t really use my home PC as VPN server, as it uses too much electricity. Luckily, I have a Raspberry PI that is a perfect fit, which only uses about 5 watts per hour, which is less than 1/10 of a typical laptop:
I initially purchased Raspberry PI during my graduate studies at SFU as a Summer project, but I never had a chance to make a good use out of it when I started my CO-OP term, followed by getting a full-time position offering at the end of the contract. Eventually I lost the motivation to do anything with it, but I figured now is a good time to do something useful at last.
I have referred to this Github repo and Post from CrossWalk Solutions for a lot of the contents. So tribute to them. Setting up VPN looks quite trivial at first, but many sources offer different approaches and it can get quite tricky when things start to get mixed up. It actually took me weeks to get it right. But to give you overview, following will be used:
- Pi-hole
- Pi-vpn
- Wireguard
Yes, VPN will introduce additional latency, but I am not trying to play a game remotely. Some latency below 100 ms does not effect the performance when coding.
Setting up OS on Raspberry Pi
Setting up Raspberry PI OS is of course the first thing that must be done. Get a Micro SD card that is at least 16 GB or larger, and install OS from the official installer here. If you would like to download any other OS, that is possible too, but my Raspberri Pi only has 2GB of RAM thus I did not want to install OS that may have higher RAM consumption. Just ensure you can connect your keyboard and monitor to Raspberry during installation, so that you can set up your user account initially.
Once that is set up, make sure you can SSH into Raspberry PI by changing
$ sudo raspi-config
interfacing options > SSH > Yes
Now you should be able to SSH into Raspberry Pi simply with
$ ssh {userid}@{raspberry_pi_private_ip}
DHCP reservation and static address
But before moving on to the next step, we need to set a static IP for our Raspberry Pi and the main desktop. This is because we will no longer be port-forwarding from public IPv4 address once the VPN is configured, and you would definitely need a static IP address for proper access.
When you run bash command:
$ ifconfig
You will see stuff like below.
inet 192.xxx.x.xx  netmask 255.255.255.0  broadcast 192.xxx.x.xxx
inet6 xx80::xx2e:xxx:fe45:764b  prefixlen 64  scopeid 0x20<link>
inet6 xxxx:xxx:7b5e:6e00:xxxx:xxxx:xxxx:6cbc  prefixlen 64  scopeid 0x0<global>
inet6 xxxx1:xxx:7b5e:6e00:xxxx:xxxx:xxxx:764b  prefixlen 64  scopeid 0x0<global>
ether b4:xx:xx:xx:xx:xx txqueuelen 1000  (Ethernet)
From the router settings, you can choose to directly declare static IP for your device. Or, you can do Dynamic Host Configuration Protocol(DHCP) Reservation, in which your router provides a long list of reserved IP table, and you choose one that you would like to assign it to your device. You must know the Media Access Control (MAC) address of the device, which does not periodically change like IP address, as MAC address is a hardware identifier (you can force changes though). In my cases, MAC address was simply the one next to (Ethernet), which is b4:xx:xx:xx:xx:xx.
There is no difference functionality wise, but because you are choosing from a list, you can ensure that you are not duplicating any IP assignment. So here, I went with DHCP reservation to get static IP. You need static IPs set up for PI hole set up.
Setting up Public DNS Subdomain
This is another very important step that’s best to be configured first. In the later steps when we set up PiVPN, it will ask for either:
- Static Public IP address of your router
- DNS Entry with Public DNS Services
It doesn’t matter which approach you use, but I was not inclined to go for option number 1, mainly because if I were to set up public IP address, I would not even bother going through the trouble of setting up VPN because I can just go with port-forwarding on static IP address, just as how I did on the previous blog post.
But downside of having dynamic IP, as the name suggests, is that IP will keep on changing and you will not be able to establish proper connections. But there are a few free services like FreeDNS Clients, that will allow you to set up DNS Entry on arbitrary domain, that will always look for the latest update to my router’s IP address.
After creating and verifying account on FreeDNS, add subdomain with A record, and map it to your routers’ IP address at the moment.
Hit save, and you are done with part 1. Now there is part 2, which is setting up CronJob that updates DNS variables on Raspberry Pi.
Go yo dyamic DNS page and copy Direct URL link at the bottom.
With below command, every 5 minutes cronjob will automatically look for changes in IP address. You can change it to something else.
$ crontab -e
$ */5 * * * * curl https://freedns.afraid.org/dynamic/update.php?XXXXX
$ sudo service cron restart
$ crontab -l #this must return valid values!
Pi Hole and DNS configuration
Okay, now we are ready to set up Pi-hole on our Raspberry Pi.
For the next few sections, I would recommend my blog post here to understand the basic concepts, especially those related to DNS. It’s extra confusing to follow along if you don’t understand the reasons behind each actions. Assuming you read it, let’s talk about what PI hole achieves.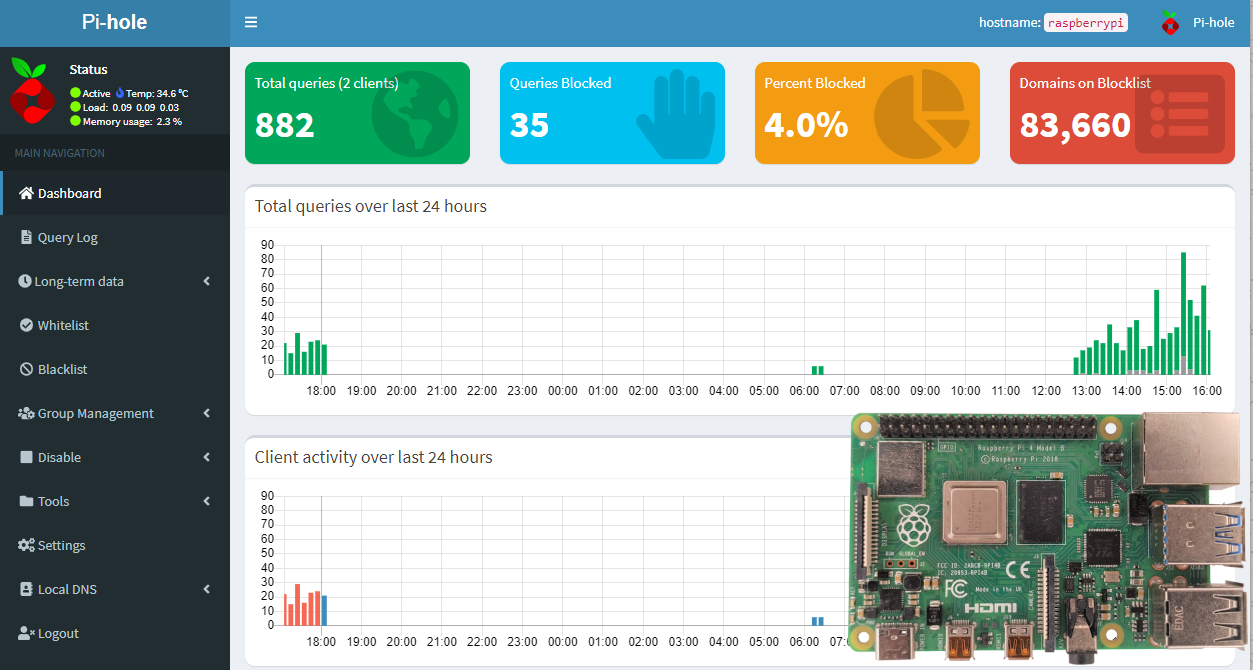
You must understand Pi-Hole is different from PiVPN or WireGuard that will be discussed in later sections. It’s not a VPN.
Pi-Hole is an advert-blocking application aimed at blocking ads at the network level. It acts as a Domain Name Service (DNS) server and, as such, queries all domains trying to access the devices connected to the network and blocks all ad-serving ones. You also block the unnecessary network requests for those ads and thus reduce bandwidth usage. Pi-hole pairs nicely with a VPN (Virtual Private Network) so that you can connect remotely and still take advantage of ad-blocking from anywhere outside your network. So we install Pi-hole just inside our Raspberry Pi, and we can protect the entire network, and monitor the statistics via the dashboard.
The installation instructions change time to time, so it’s best to check out the official page. Installation should be easy.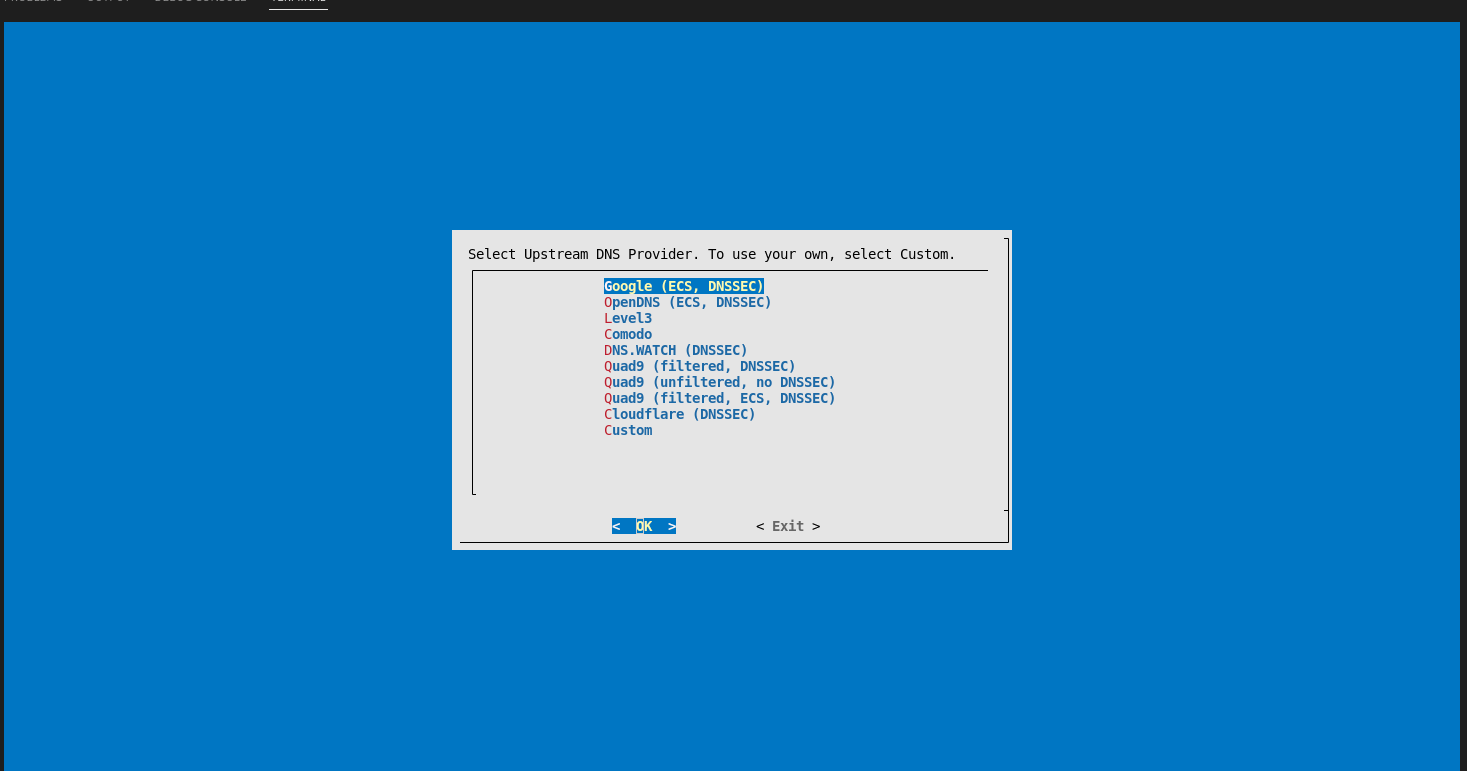
Once download is complete, change your default password to something else:
$ pihole -a -p
you should be able to boot up web interface anytime via:
$ http://{static_ip}/admin
$ http://pi.hole/admin  #or
Unbound Recursive Server
Remember that we randomly set-up upstream provider when installing Pi-hole? Now we need to fix this with Unbound.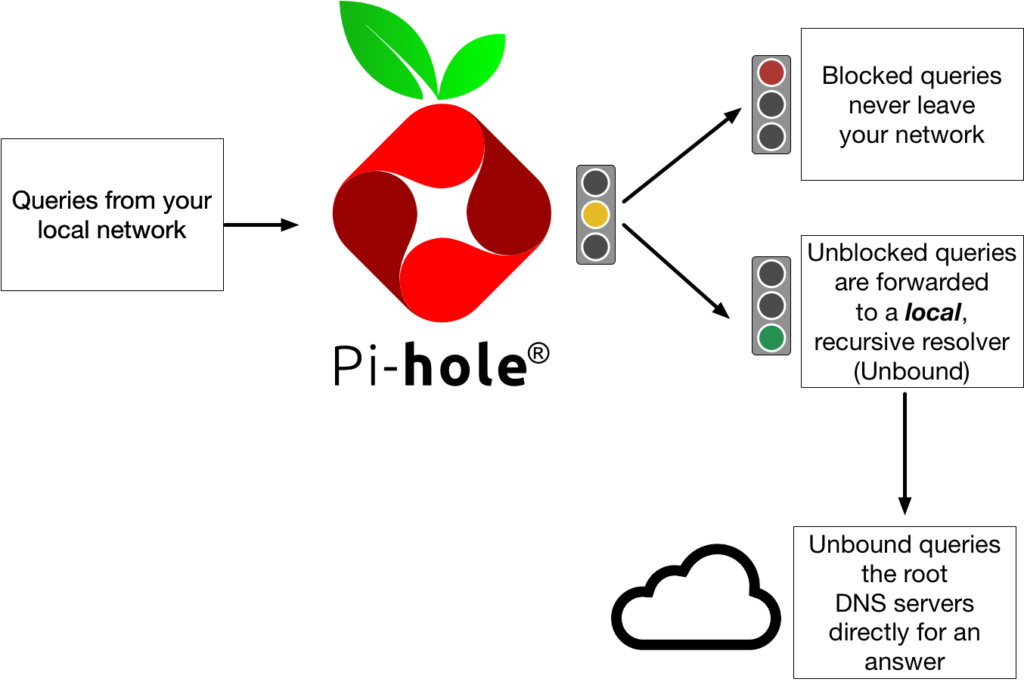
Whoa, at this point I was honestly a bit overwhelmbed, thinking “This is much harder than I thought”. Many tutorials suddenly started talking about Unbound while installing Pihole, which caused some extra confusion. But I had already came too far with this, so I needed to calm down and spend some time to read about the relationship b/w Pihole and Unbound.
Okay, we already know that Pi-hole is a sink hole for Ads, so that when we make requests, all the queries that may be used to throw ads back at us or cause any other trouble, go straight to the sink hole. When users make requests our requests by default are forwarded to Upstream DNS servers (Google.com, etc), where there can be privacy concerns. For example, when these DNS servers get hacked, we might have requested site A, but we might instead be forwarded to some phishing site B (millions of people using this DNS server will be affected).
So we have tiny, self-hosted DNS servers like Unbound, which does:
- When client asks for site A, Pi-hole checks cache first, and return result if not in block list.
- If not in block list or cache, it goes to Unbound Recursive DNS resolver instead of Upstream DNS servers.
- Unbound query hits the root server > TLD > Authoritative Server
- Authoritative Server will finally give you all the IP information.
- Pi-hole saves the answer to the cache.
Awesome, now that makes perfect sense! To install,
$ sudo apt install unbound -y
Now we need to generate config file for unbound, which can be found here
$ sudo nano -w /etc/unbound/unbound.conf.d/pi-hole.conf
Make sure you are keeping ports consistent, (something like 53, or 5353). Unbound must be configured to refuse connections besides your local traffic, so:
$ # IPs authorized to access the DNS Server
access-control: 0.0.0.0/0 refuse
access-control: 127.0.0.1 allow
access-control: 192.168.x.0/24 allow

# Create DNS record for Pi-hole Web Interface
private-domain: "pi.hole"
local-zone: "pi.hole" static
local-data: "pi.hole IN A 192.168.x.x"
access control here is based on Classless Inter-Domain Routing (CIDR) notation. If you are unsure how the range works, read this article. After replacing 192.168.x.x with your Raspberry Pi static IP, do:
$ sudo service unbound start
$ dig pi-hole.net @127.0.0.1 -p 5353 #for testing
$ sudo service unbound status # check status this way too
If dig returns some values, you are all set.
Hooking up Unbound and Pi-hole together
Okay Unbound is good to go, but it’s meaningless unless it’s connected to Pi-hile properly.
After logging back into Pi-hole admin page, we need to congire DNS Server settings. For more detailed tutorial on setting up Pi-hole configuration refer to the link. Go to Settings > DNS and uncheck any 3rd party Upstream DNS servers.
Now you will see this in the interface settings.The Upgstream DNS servers will be identical to Unbound configuration, so 127.0.0.1#5353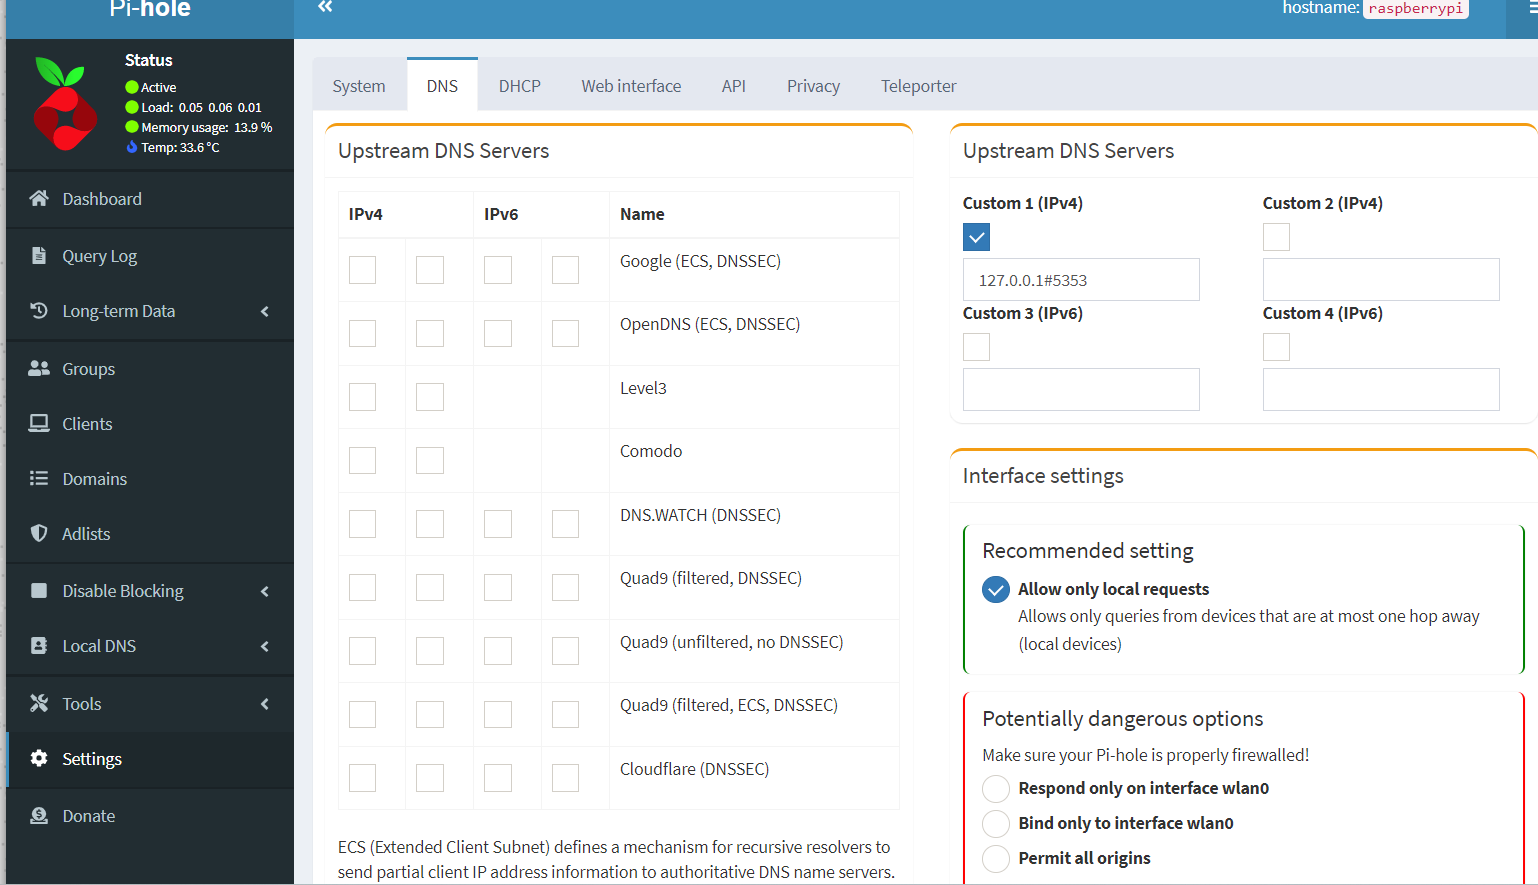
But what will be a bit confusing is the Inteface Settings. Many tutorials suggested going for “potentially dangerous options”, like permitting all origins, or establishing custom rules. I did not fully understand the rationale behind it (as none of the posts really explained why), as if you are on VPN, you will be considered as local traffic and thus you will be automatically covered. So I decided to keep it as it is instead of trying to go for options that frankly sounds quite intimidating.
PiVPN and WireGuard
And we are finally at the last stage, setting up PiVPN Installer, which is the easiest way to set up VPN as far as I know. It acts as a glue b/w Pi-hole and WireGuard VPN.
First of all, what is WireGuard? WireGuard is an extremely simple yet fast and modern VPN that utilizes state-of-the-art cryptography. It aims to be faster, simpler, leaner, and more useful than IPsec, while avoiding the massive headache. It intends to be considerably more performant than the traditional self-hosted applications like OpenVPN. This is especially useful for Raspberry Pi, in which applications need to be as light and efficient as possible.
UDP Port Forwarding
For both WireGuard and OpenVPN, it’s quite painful to install it from scratch, but if you use PiVPN installer, things get much simple. It also knows that you already have PI-hole set up, so it will add things into the configurations. But note that WireGuard needs UDP port forwarding on the router. Make sure you forward port 51820 to Raspberry PI.
Description: WireGuard VPN
Public UDP Ports: 51820
Private IP Address: 192.168.x.x
Private UDP Ports: 51820
Now to install PiVPN:
$ curl -L https://install.pivpn.io | bash
If you set up static IP for Raspberry PI, UDP port-forwarding, and Pi Hole/Unbound configured, everything should make perfect sense until you get to Public IP or DNS section.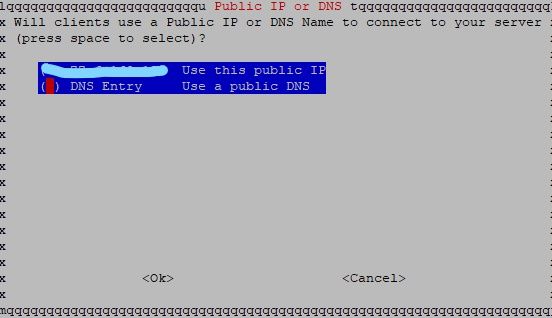
Choose DNS Entry, and enter the subdomain we have created using FreeDNS earlier on. Once the installation is complete (you will be asked to reboot), we need to create a VPN profile for every client we have.
pivpn -a
This will generate credential file, which should reside in the client machine (Mobile version would use QR code instead).
Connecting WireGuard client
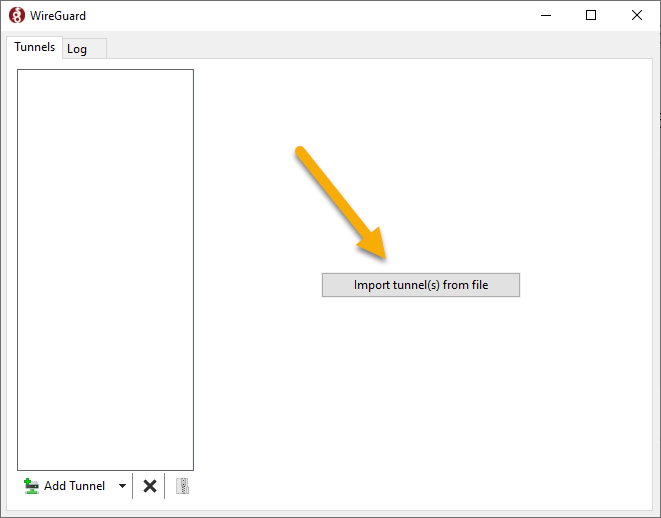
Funny thing about many tutorials out there on the internet, is that they do not mention how to connect to the VPN server from the client side. Perhaps this last step is too obvious for some, but it is what makes the entire setup meaningful. Without knowing how to connect, everything we have done up to this point will be wasted. You need to download Wireguard Client, in which case I downloaded the Windows Version for my laptop client.
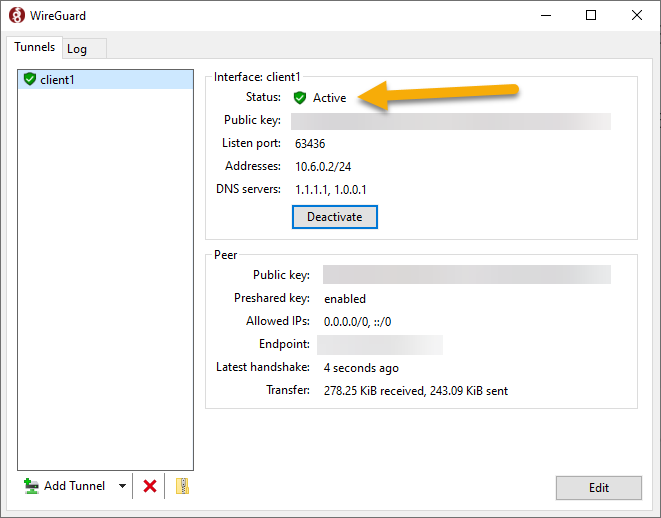
With the config file we got from the server, activating should be dead easy. BUT you may experience errors, where you can connect VPN, but cannot access the internet. Do not worry, there is an easy way to automatically fix this via PiVPN. Kudos to their team.
If you run pivpn -d, PiVPN will show what may be missing from your current setup, and will automatically run fixes. Run this couple times to ensure that no error messages are seen. Now try connecting again.
And that is it! I had never expected VPN set up to be this difficult, but I learned so much in the entire process and it was worth all the effort.